
Making Sense of It All
A simple chicken sauté is what many recipes are trying to reveal.
What does a “chicken cacciatore” in Cook’s Illustrated have in common with a “cast iron skillet chicken” in Bon Appétit and a “pan roasted chicken” by Martha Stewart?
Each one is just a sauté.
A sauté is so universal and so adaptable that recipe-writers don’t even realize when they employ it. They’ll decide that they want a quick way to brown something, and a way to turn the juices into a sauce, and for it all to occur in the same pan while everything finishes cooking (!)
That’s a sauté.
So, when Cook’s Illustrated deliver a pseudo-scientific treatise on dressing chicken pieces in a light sauce of their own juices, it’s a sauté. And when Bon Appétit announce a “master recipe” that amounts to browning chicken legs in oil, that is sautéing. And when Martha tells you to sear the chicken in a “pan” then “roast” it in the oven, she is being redundant because that is a sauté.
The reason why recipe-writers constantly reinvent the wheel and fall over themselves repeating one another is that they always see a dish as an end in itself.
But a dish is only one part of something, which is your meal, the moment when you sit down to actually eat what you’ve just cooked.
Focusing on the meal rather than the dish improves your perspective. It compels you to prioritize outcome over effect.
Outcomes are things that you can foresee. You know in advance, for example, that on a typical weeknight you’ll want dinner to come together quickly. You’ll want ingredients to carry their own weight since you can’t expect to have something like a homemade stock on hand. You’ll want the meal to be delicious and stimulating, rather than taste like an afterthought.
A sauté is the obvious technique. It was practically invented for this scenario.
And so your work in the kitchen is conveniently predetermined. You’ll cook something like chicken, because lean meats cook quickly. You’ll brown the pieces, because browning rapidly intensifies the meat’s natural aromas. You’ll finish everything in the oven, because this allows you to get the table ready while dinner finishes cooking.
A sauté is easy for me to teach you and effortless for you to repeat.
I just need to clear up something about the word itself, “sauté.” It refers to both a technique and a dish.
“Sauter” (soh-tay) is a French word that literally means “to jump.” It’s used in French in the same way that we use the word “toss,” as in to toss something in a skillet.
Tossing is simply a way to sear the surface of an ingredient, which cauterizes raw proteins and starches before they stick to your pan. Sautéing accomplishes the same thing.
It doesn’t involve “tossing,” however. When you sauté chicken, for example, you just let it sit.
That’s because sautéing exists not only to cook something but to brown it.
(Even in French, “sauter” can mean sauté, the word in this sense having lost its literal meaning.)
Browning tastes good. That’s why we do it.
So why don’t we just throw the chicken on a grill or shove it under a broiler? Why bother to learn something with a French name?
The reason is that a sauté is also a complete dish. It’s a strategy, one that’s designed to draw out the flavorsome liquids of an ingredient, brown these juices against a searingly hot pan, dissolve them once again in another tasty liquid like reduced wine, and pour this back over everything.
A grill, on the other hand, permits these juices to fall onto hot coals where they vaporize and produce a smokey flavor. Broiling in your oven—well, this is actually a misguided technique. Home ovens are neither hot nor dry enough to sear ingredients properly. Either your food dries out or you’re left with a pan full of drippings and no easy way to make a sauce.
The dish-that-is-a-sauté is simple to make. If the ingredient to be sautéed is very light and thin like a veal cutlet, then the dish itself is over and done with in little more than the time it takes to brown. Often, however, the ingredient is something like a chicken leg, which is more dense and fibrous. It needs to cook for a while longer at a lower temperature.
Many hypothetical ways exist to accomplish this second step, and we can spend the rest of our lives watching foodies on the Internet debate the issue, the blind leading the blind.
By looking at a sauté from the vantage point of your outcome, the method is clear: You want a way that enables you to put a nice meal on the table rather than a way that will have you bursting out of the kitchen at the last minute, hollering at everyone to gather ’round the table as you slap a skillet down on a wadded dish towel.
Your time and attention is better spent on matters of true creativity, such as distinctive vegetable pairings or whether some flavor-tweak in a recipe is genuinely worth the effort. You could arrange the flowers on the table. You could show your four-year-old how to place the knife and fork.
The one thing you don’t have to focus on is how to sauté the chicken, because there is only one way. And that’s what I’m about to show you.
You need only buy:
Chicken legs or thighs
If you keep a Basic Inventory, you’ll already have:
Black pepper
Disposable bleach wipes
Disposable gloves
Finishing salt
Fresh parsley
High-temperature oil or fat
Paper towels
Plastic wrap
Shallots
Unsalted butter
White table wine
Disposable bleach wipes
Disposable gloves
Finishing salt
Fresh parsley
High-temperature oil or fat
Paper towels
Plastic wrap
Shallots
Unsalted butter
White table wine
And finally, you’ll need these Basic Tools:
An apron
A bench scraper
A dishwasher-safe cutting board
A disposable knife
A heat-proof container, such as a Pyrex pitcher
A large mixing bowl
A pair of kitchen shoes
A pair of long kitchen tongs
A pair of oven mitts
A pan
A wooden cooking spoon
A bench scraper
A dishwasher-safe cutting board
A disposable knife
A heat-proof container, such as a Pyrex pitcher
A large mixing bowl
A pair of kitchen shoes
A pair of long kitchen tongs
A pair of oven mitts
A pan
A wooden cooking spoon
Now, before I tell you how to sauté chicken, I need to show you how to set yourself up for a sauté of any kind.
This is going to take a few thousand words, but you’ll know exactly what to do afterwards: You’ll know how to prepare your ingredients, how to preheat your pan, exactly what kind of oil to use, and how much.
Sautéing will become one more fundamental technique that you can whip out at the drop of a hat without breaking a sweat.
Feel free to skip ahead if you’ve read this already. Sautéing works the same for everything, and what follows, I repeat throughout this site.
Here we go:
- Sauté Mastery in Five Simple Steps
- Have a pan that heats uniformly and retains that heat very well.
Sautéing is firstly a non-stick strategy.
You want the molecules of your food to bond with one another before they do so with those of your pan—before they “stick,” in other words.
So, you’ll use heat that’s high enough to instantly cauterize proteins and starches but not so high that it scorches your food, or burns the drippings in your pan, or vaults your cooking oil to its smoking point (which is a signal that the oil is about to set fire).
Paradoxically, sautéing requires sticking to occur. This is because sautéing is secondly a browning strategy.
You’ll brown not only the surface of your ingredients but their internal liquids, which will emerge as a result of the intense heat, then vaporize as soon as they hit your pan and leave behind an extremely tasty, caramelized residue, practically welded to your pan’s surface.
This residue is called a fond, which is a French word that refers to the “foundation” or “heart” of something. Dissolving this fond in a little liquid forms the basis of your sauce.
And so you have a dilemma. You want your ingredients to remain free but you want their juices to stick.
The solution isn’t a Teflon pan, because nothing at all sticks to that kind of surface—not even the drippings, which remain floating in the cooking oil, completely diluted.
The solution is to have a pan that is relatively stick-free as long as it is adequately preheated.
And yet preheating a pan is sadly one of those things that recipe-writers are unable to convey, since they tend to understand things in principle but not in practice.
How else to explain oft-repeated advice like holding your hand six inches above a pan then counting the seconds until the heat becomes unbearable. You’re better off using Tarot cards.
A properly heated pan isn’t even a “technique,” strictly speaking. It’s an appliance.
Your pan is an extension of your stove. Together, they form a single apparatus.
To coordinate this pan-stove device, first take a look at your largest burner, the one that delivers maximum heat.
Measure the diameter of this burner.
A diameter is a line that intersects the center of a circle measured from edge to edge.
Now:
Measure the diameter of the bottom of your pan.
In order to cook anything on your stove reliably, the diameters of your burner and your pan must equal one another, give or take a quarter of an inch (0.5 cm).
(If you have a gas stove, then crank the flame maximally and make your best guess. Sizing gas burners with pans is a matter of approximation.)
If the burner is too small, it will form a scorching hotspot in the middle of your pan where things overcook. Over time, the mismatch will also warp your pan’s construction, eliminating its ability to distribute heat evenly.
As for the type of construction that works best, I go into detail about this in my recommendation for a Dutch oven. I’ll summarize:
You need a pan that conducts, distributes and retains heat very well.
Conduction permits the pan to get very hot. Distribution permits the heat to migrate evenly throughout the pan’s surface, edge to edge. Retention enables the pan to remain very hot even with the addition of a cold, dense ingredient like a refrigerated steak.
Heavy-gauged pans made of aluminum sheathed in stainless steel do the job superlatively. They’re much less expensive than copper lined with tin (the traditional option) and better-performing than cast iron glazed with ceramic (a well-loved standby for generations).
I’ve used All-Clad for years and can vouch for their performance and durability. The company’s MC2 line is affordable, while its D7 line is superior.
That said, if you already have a cast-iron pan (or similarly, one made of heavy-gauge carbon steel) then it will work fine.
The proper pan-stove arrangement eliminates any trouble with heat fluctuation—no fiddling with the burner, no babysitting the pan.
All you need to do is find the sweet spot on your stove dial where the temperature is just right.
Fortunately, the laws of physics have blessed us with a simple way to determine exactly what that point is. It’s a method that you can use on any stove, with any pan, wherever you happen to be.
- Nature Has Provided Your Pan with a Thermometer
Have ready a glass of water, a quarter-teaspoon and a kitchen timer.
Place your pan on its burner then turn the stove dial to halfway between the mid- and high-points.
(If you have a range of numbers from one to ten, then choose seven.)
Start the timer.
After one minute, fill your spoon with water, hold it right over the surface of your pan, and carefully overturn it.
The water will most likely erupt into a tiny maelstrom of hissing
steam. This indicates that the temperature of your pan is too low.
Keep waiting.
Every fifteen seconds or so, try another spoonful of water.
If after three or four minutes the water still boils off, then the heat of your burner is entirely too low. Turn it up just a little.
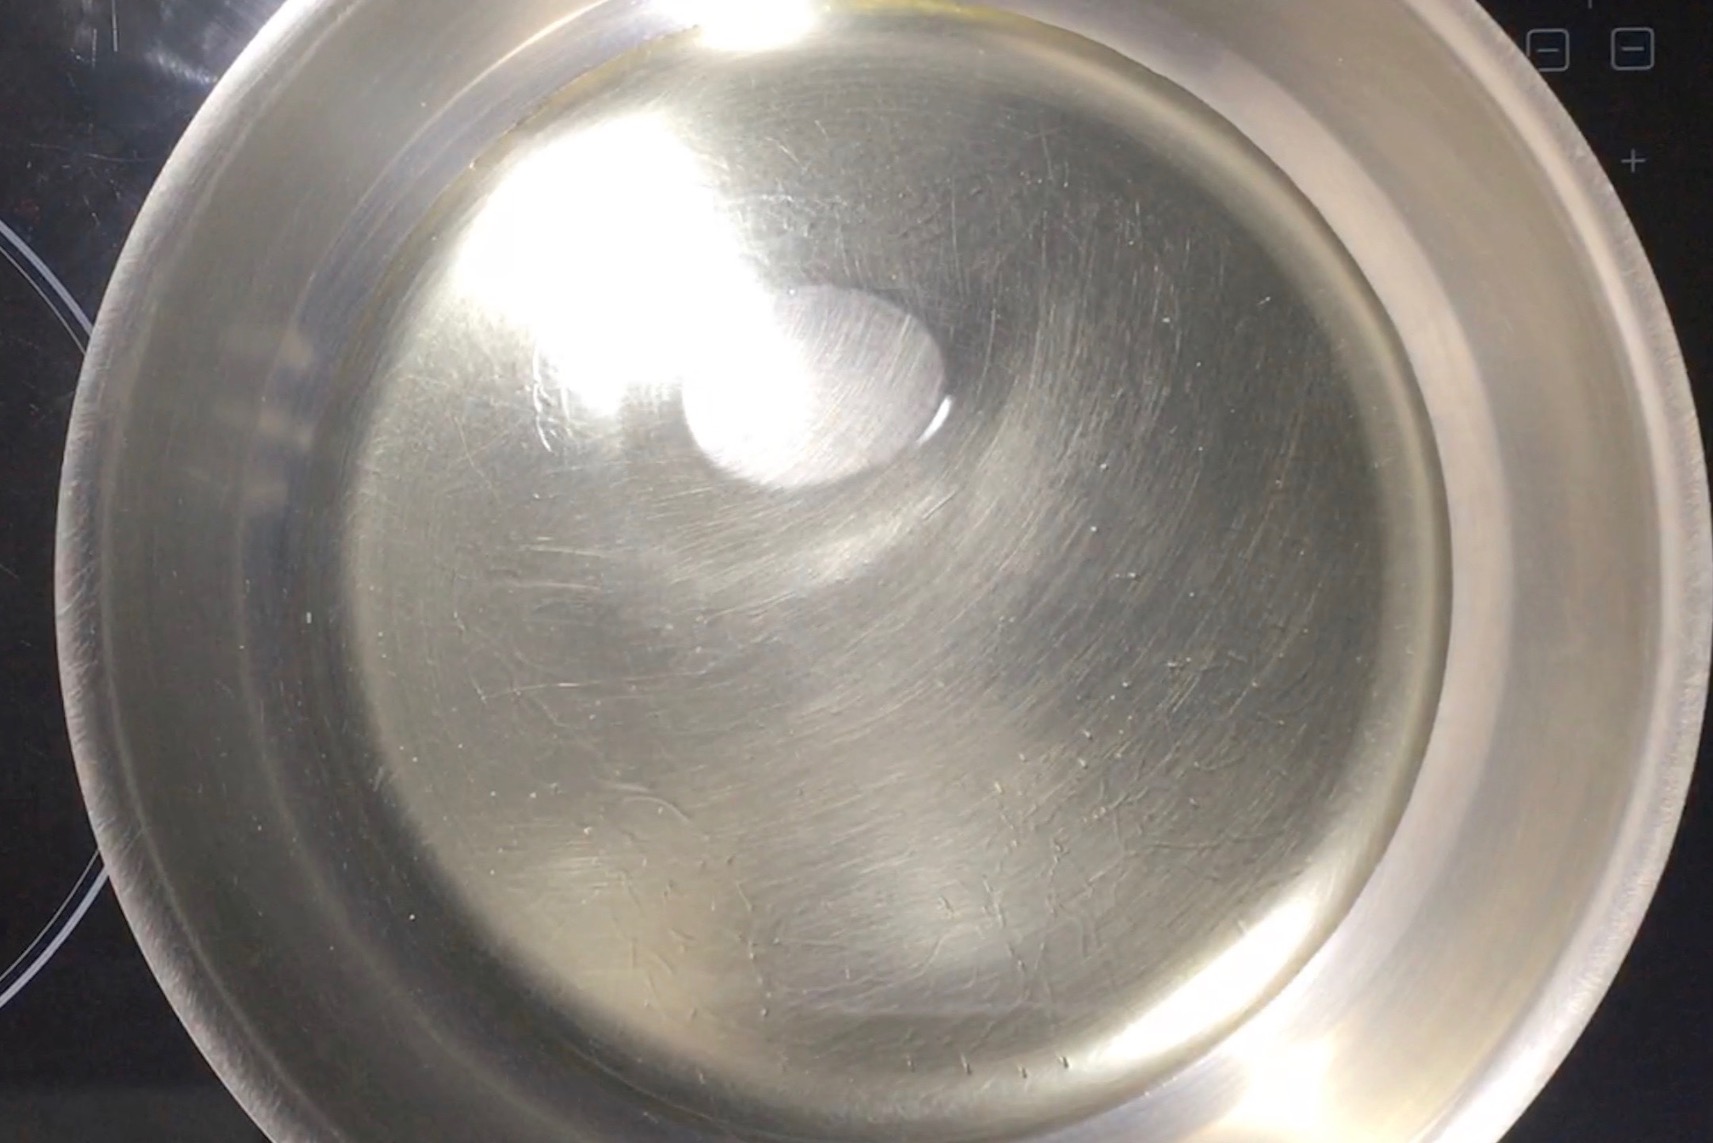
Eventually, the entire quantity of water will plop out onto the pan like a fresh egg yolk or a bubble of mercury, completely intact.
This is what it looks like:
This phenomenon is called the Leidenfrost point (named after an eighteenth-century German doctor who described the effect).
When water encounters a surface below the Leidenfrost point, it simply evaporates. At the Leidenfrost point, however, the first molecules of water to touch the hot surface vaporize so quickly that they can’t escape out from under the rest of the oncoming liquid, which remains suspended overtop like a hovercraft.
A kind of paradox ensues. The vapor can’t escape because it’s trapped beneath the bubble. The bubble can’t boil off because it rests atop a layer of vapor that prevents the water above from attaining the boiling point.
(After about seventy seconds, the bubble does finally evaporate.)
If the pan is too hot, it will scatter the water into not just one but many tiny Leidenfrost bubbles, as you saw in the video above.
Now:
Mark this exact point on your stove dial.
And once your pan has cooled completely:
Put it back on the burner, turn your stove dial to that mark, start the timer and do your test all over again.
Note the amount of time that it takes for your pan on its burner to reach the Leidenfrost point.
Now you know how long it takes for your pan to preheat. You can just put your pan on the stove, crank the heat and set a timer. No more guesswork.
The Leidenfrost point of water tells you that your pan’s surface is nearly 400°F (204°C), which happens to be the ideal temperature to heat oil for sautéing.
Oil heated to the Leidenfrost point will sear your ingredients as quickly as possible without burning the pan drippings.
In fact, the oil in the pan is mainly what cooks your food, rather than the pan surface itself. Properly heated oil is what cauterizes the proteins and starches of your ingredients before they encounter the pan’s bare surface.
And so preheating your pan has nothing to do with “pores” in the metal, as you may have read.
Don’t rely on this oil to gauge its own temperature, however.
If you simply watch for the oil to “shimmer” (a favorite tip of recipe-writers) then your pan will be too cold. The shimmering point of many cooking oils is fully 100°F (38°C) below the Leidenfrost point.
Don’t wait for the oil to start “smoking,” either. This advice is asinine.
The smoking point of oil is a signal that it’s preparing to spontaneously ignite, which means that you’re about to have a two-foot-high campfire right in front of your face.
Smoking oil is quickly becoming acrid, moreover.
So what kind of oil do you use? And how much? That’s next.
- Use an oil that withstands high heat, and use enough of it.
What kind of oil do you use?
The answer is simple:
Use an oil whose smoking point is higher than the Leidenfrost point.
These include, from most to least heat-resistant:
Refined safflower oil
Refined “extra-light” olive oil (not “extra-virgin” olive oil)
Refined peanut and corn oils
Refined sunflower oil
Refined canola oil
Refined “extra-light” olive oil (not “extra-virgin” olive oil)
Refined peanut and corn oils
Refined sunflower oil
Refined canola oil
Refined oils have been extracted using chemical solvents then bleached and deodorized, which removes any particle that would spoil an oil’s heat tolerance.
As long as they’re fresh, these oils are tasteless, odorless, and they do the job.
You might worry, however, that the refining process may impart certain unhealthful properties. It’s the kind of thing that concerns me, too, although I haven’t been able to find conclusive evidence either way.
Feel free, nevertheless, to use the following traditional alternatives, which work very well:
Clarified butter (i.e., ghee), which tolerates heat as well as peanut and corn oils
Rendered beef tallow, which is equivalent to canola oil
In my Basic Inventory, I recommend keeping on hand a “high-temperature” oil or fat of some kind. Pick one from above and put it into your pantry.
They are simply cooking mediums that you’ll immediately discard. Very little will remain in your final dish.
So, how much do you use?
Pour enough oil into your preheated pan to nearly cover its bottom.
Since your ingredients will naturally displace some oil, pouring in enough to nearly cover the pan’s empty surface is probably using a few tablespoons too many.
But this amount of oil is simple to measure and it does the job. And it isn’t too much.
After all, why don’t you just deep-fry?
The problem with deep-frying is that your drippings float uselessly in the mass of oil, never clinging to the surface of the pan from where you can dissolve them into a sauce.
This is why we tend to deep-fry breaded foods: We’ve elected to pursue the taste of browned batter rather than that of browned meat drippings.
Sautéing isn’t just an arbitrary technique for cooking protein, after all. It’s a strategy, a basic way to highlight an inherent quality in one of your ingredients.
Keeping strategy in mind is what helps you to decide what methods to use, whether the work is worth the effort regardless of what any recipe says.
- Whatever you put into this preheated oil must be dry.
This is a matter of safety, first of all, because water hitting the hot oil will spatter in all directions.
Moisture also prevents your ingredients from browning, which is the result of something called the Maillard reaction, whereby amino acids and sugars undergo a series of transformations that yield delicious flavors.
Maillard (my-yar; named after a twentieth-century French chemist who first described the effect) occurs only at temperatures much higher than the boiling point of water, so it begins only once all moisture has evaporated from the surface of your ingredients.
Water robs your pan of heat, as well, carried away by hot steam as the moisture evaporates. This can even result in a temperature crash if your ingredients are so wet that a large volume of steam makes off with a large quantity of heat (a cold, wet steak yielding silence rather than sizzle).
So, it’s the dryness of an ingredient rather than its temperature that keeps your pan nice and hot. You don’t need to bring your meats to “room temperature,” as recipe-writers constantly advise. Even Monsieur le Chef repeats this canard.
What they actually want you to do is to leave your meat out on a countertop for a half of an hour or so, which succeeds only in raising the meat’s surface temperature by a couple of degrees.
If you actually allowed raw meat to sit out long enough for its interior to reach 73°F (23°C)—“room temperature”—the meat would spoil. Its cooking aroma wouldn’t be the lovely fragrance of toasting meat but the odor of a frying jock strap.
Why then do we see this advice—especially from the Chef?
Much of what Monsieur le Chef and his colleagues do is the product of many generations of observation and experience. The methods that they employ achieve results, which is why they use them.
However, no one will ever have the time and money to conduct controlled scientific trials on each one of the chef’s many habits in order to determine precisely how they work.
That’s why his metier is known as culinary “art,” not “science.”
If the Chef leaves his meat out on a countertop for a half of an hour, it’s probably because this simply dries it off. The chef’s forebears of the eighteenth and nineteenth centuries didn’t have paper towels, after all. So this is the method that Monsieur le Chef’s mentor beat into him when he was a child apprentice and what the Chef now beats into the heads of his own unpaid interns.
As for recipe-writers, they copy the chef because restaurant food is all they know. Most of them aren’t really home cooks.
- Sauté only what cooks quickly.
Sautéing is convenient in principle. So why not do it with everything?
A sauté is convenient only by coincidence. It just so happens that ingredients without much fat and connective tissue taste best when only just-finished or even slightly undercooked. Past this point, light and delicate meats leech out so much of their interior moisture that they become unpalatably dry, and vegetables become limp and tasteless.
But what do I mean by “fat” and “connective tissue?”
Meat can be very fatty and still delicate enough to cook quickly. This t-bone steak, for example, is very well marbled:
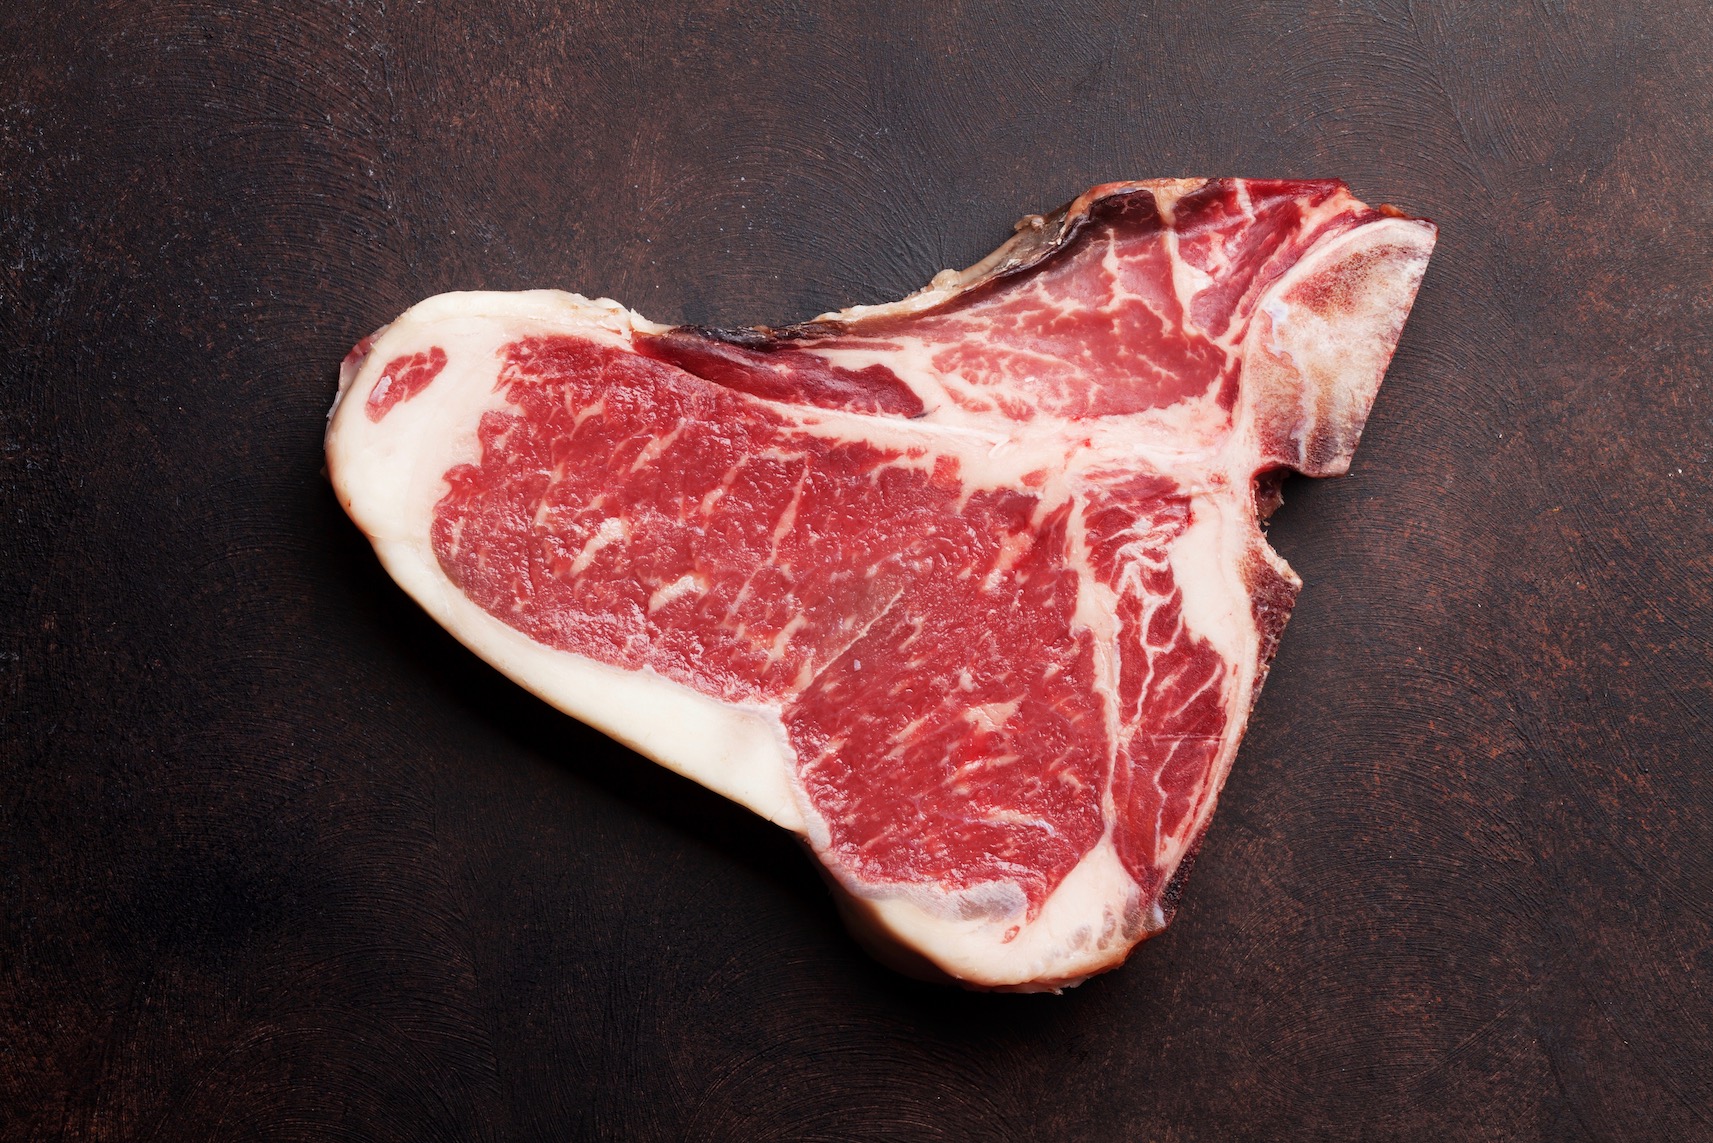
The many fine veins of fat you see here melt very quickly, contributing to the excellent flavor and mouthfeel for which beef is famous.
Now look at these slices of beef shin:
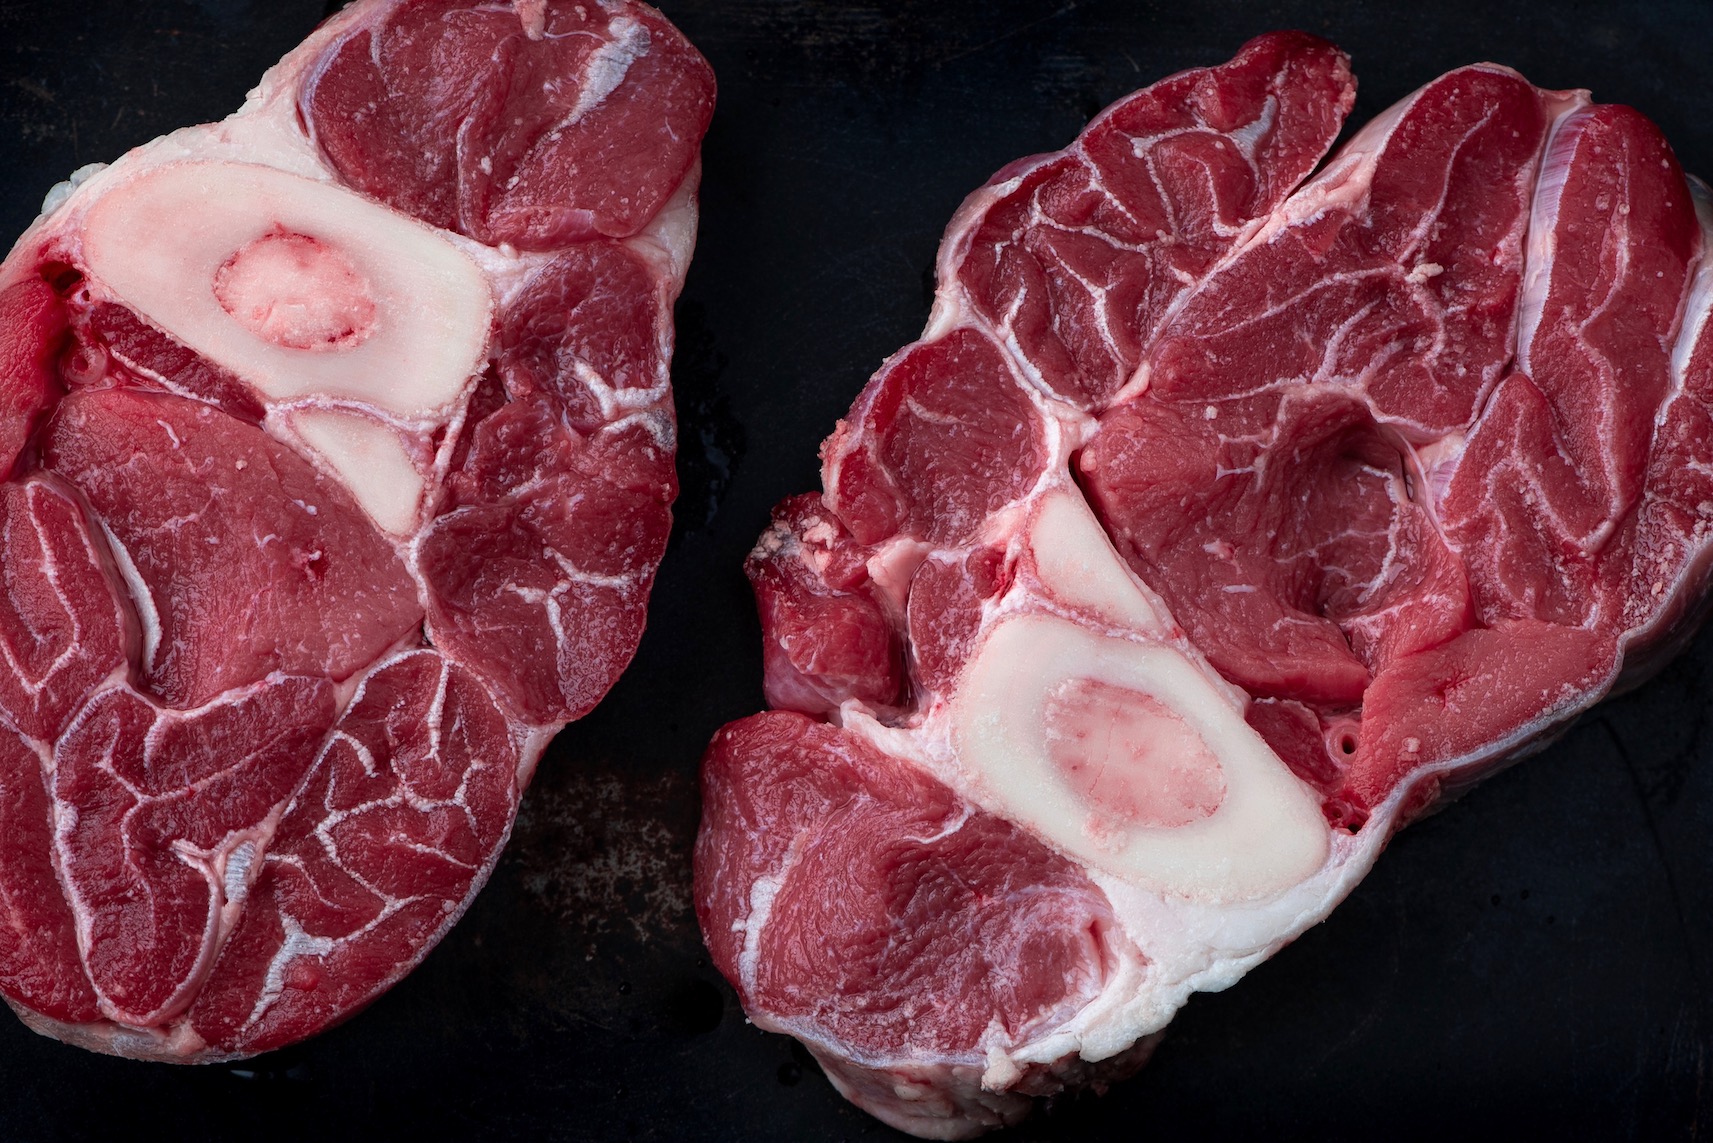
Note the many veins of connective tissue that make a shin of beef look almost like cerebral tissue.
The more heavily worked a muscle was during the animal’s life , the more deeply reinforced it will be with connective tissue, which is why cuts of beef from the round and the chuck (that is, the leg and shoulder) possess deep seams along which the meat divides into various oddly shaped portions.
Chewing through connective tissue is impossible. Hours of low heat are required to melt it, after which it becomes a richly gelatinous substance that coats the meat.
Tough cuts are best when they’re over-cooked, and because this takes so long we have various ways to keep the meat moist. They’re all part of the way that we make braises, blanquettes and pot roasts.
(I’ll be writing about these as soon as possible. This is a new website, and I’m adding content every week. Sign up to my newsletter and get updates delivered straight to your inbox.)
As for sautéing, chicken is ideal, along with nearly any poultry and anything from the mid-section of a cow, pig or lamb (from where we acquire “steaks,” “chops,” and “tenderloins”).
Chicken breast and beef tenderloin are fundamentally the same, in other words.
Learning to think of foodstuffs by how they function as ingredients allows you to make decisions much more easily on what to cook and how to cook it.
•
And so that’s it. Sautéing is foolproof as long as you set yourself up correctly. What follows is just an illustration of principle.
How to Sauté Chicken
This is a fundamental way to prepare a key ingredient.
When you know the basic ways of preparing whatever you lay your eyes on in the produce aisle or meat counter, then you can cook. No other skill is truly necessary.
Seemingly complex dishes are just combinations of these fundamentals. If you can poach a carrot and stew a joint of beef, then you can make boeuf aux carrots. It’s that simple.
The key is in having methods that enable you to create a workflow that matches your life and your own routines—the workflow of a home cook, in other words.
That’s something that nearly every recipe fails to convey.
- Set yourself up.
Give the chicken a whiff.
This is the necessary first step to cooking with any poultry. The chicken should have no odor whatsoever. That’s the ideal, at least. But if you detect even a trace of something like sulphur, bite the bullet and throw the chicken out.
Put on an apron and a pair of shoes that are waterproof and slip-resistant.
The kitchen is a hazardous workplace with sharp knives and scalding oil.
Set out a mixing bowl to use for scraps.
That way, you won’t be reaching for the trash every other minute.
Use a bench scraper rather than your fingers to clean your knife blade.
Use it as well to keep your workspace tidy.
Finally:
Preheat your oven to medium-high (375°F/185°C).
- Prepare the chicken.
In the future, I’ll recommend that you buy a whole chicken because that works best for reasons of economy and for your workflow as a home cook.
For now, chicken legs (or thighs alone) provide an ideal illustration because their compact shape readily browns and doesn’t easily over-cook.
So, how much chicken can you cook?
The answer is simple:
Cook as many pieces of chicken as will fit comfortably in your pan without crowding or leaving large gaps.
If the pieces crowd one another, their juices won’t evaporate quickly and the meat will over-cook before it browns.
If large gaps exist, then drippings are more likely to burn.
I find that two batches can be done in the same pan without risk of burning the drippings.
So, to prepare the chicken, you’ll dry each piece then season them with salt.
Wet ingredients cause grease to splatter everywhere. Evaporating water also robs your pan of heat. Your ingredients won’t even begin to brown until it has all boiled off.
So:
Put on your disposable gloves.
Gloves keep you from having to wash your hands afterwards with the thoroughness of a surgeon, and from having to do this repeatedly upon realizing, once you’ve already touched the chicken, that you forgot the towels or the salt or something else.
Learning how to cook involves mostly learning your own routines, saving yourself from interruptions like this. Disposable gloves are part of this process.
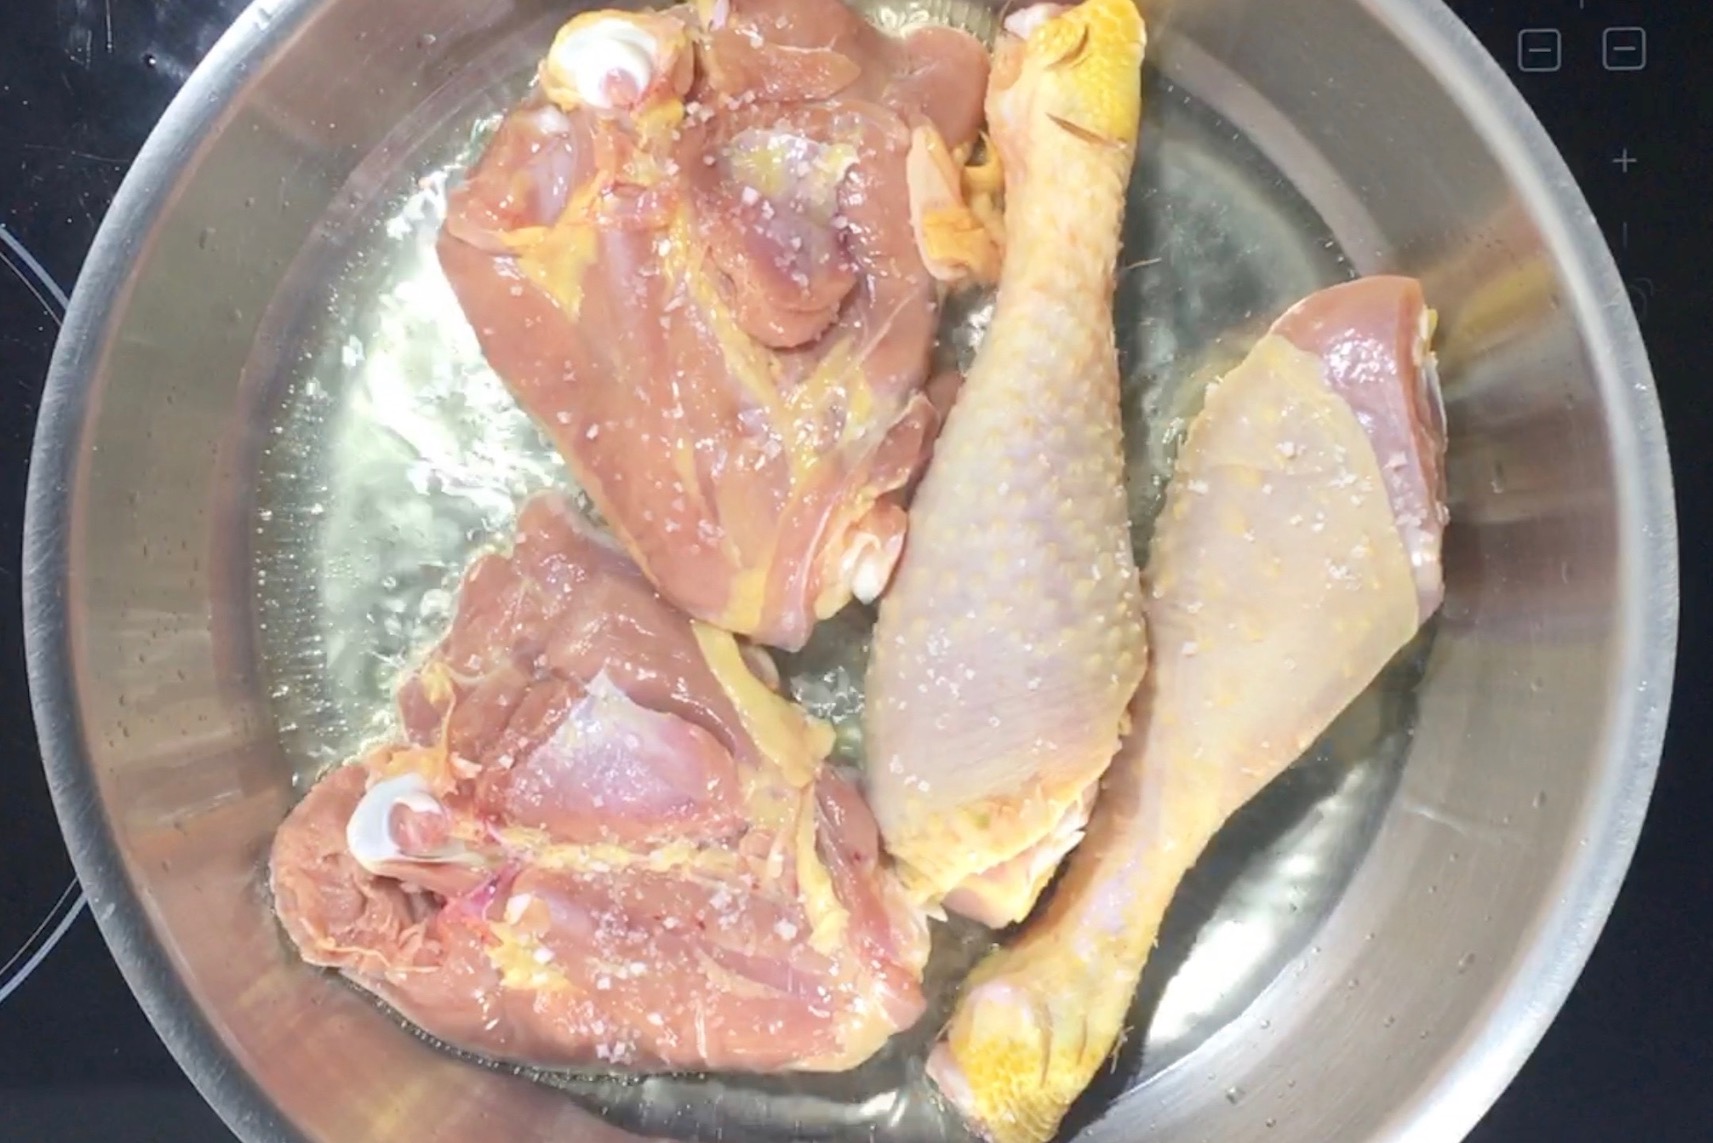
Dry off the chicken using several sheets of paper towel.
Then sprinkle them liberally with salt.
Salting is something that needs to occur only right before you cook the chicken, since the intense heat of the pan allows the salt to dissolve throughout the meat very quickly.
Now, clean up:
Anything that touched the chicken goes into the dishwasher or the trash.
Anything to be washed by hand should not be done in your kitchen sink. Try a bathroom sink.
Wipe up afterwards with the bleach wipes.
Does this seem like overkill? Have you ever had salmonella? No? Well, talk to someone who has.
Do this procedure a few times and it will be second nature.
- Prepare everything else.
Sautéing is quick. Efficiency is key. It’s also a little hazardous because of the hot oil. You’ll want to be as free of distraction as possible once things are underway.
So, first:
Set out a tablespoon of butter.
You’ll use it to sauté the shallot.
Put another one in the fridge.
You’ll use it to thicken your sauce.
Mince the shallot.
I find that one shallot (about 5 oz./20 g) is fine for the amount of sauce that you’ll make in one pan.
Mince the parsley.
A tablespoon of minced herbs, give or take, is likewise sufficient.
Any fresh herb will do. The flavor of parsley seems to go with everything, which is why it’s in my Basic Inventory.
Set aside maybe a quarter cup (60 ml) of white wine.
The amount isn’t really important, because you’ll be boiling it all down into a glaze. A quarter-cup is enough to impart a distinct flavor and acidity to your sauce.
(We use white wine, because red wine tends to overwhelm light fare like chicken.)
Set aside maybe a third of a cup (80 ml) of water.
This amount is what will boil off in your oven as everything finishes cooking, leaving you with enough liquid to make a light, intensely flavored sauce with which you’ll nap your ingredients.
You’ll want to experiment a little. Lately, I’ve been using less water, more like a quarter-cup, because this leaves me with just a glaze in which I stir a bunch of precooked vegetables, dumping it all back over the chicken. (To read more about this, see the variations below.)
Now is probably a good time to mention that you don’t need chicken stock.
You don’t need chicken stock. A lot of sauté recipes call for it, particularly those written by Monsieur le Chef, because homemade stock does indeed make everything taste just that much more exciting.
However, the kind of flavor that stock provides is already what a sauté is designed to achieve.
A sauté is a strategy, as I mentioned earlier. It isn’t a flavor-tweak. It’s a method that allows you to transform a raw foodstuff into a dish that is perfectly delicious, which doesn’t leave you with the feeling that “something” is “missing.”
Thanks to the lexicon of modern chemistry, we can specify exactly what that “something” is: amino acids like glutamine, essential fatty molecules, complex sugars, sophisticated aromatic compounds.
We know, too, that these qualities must be freely available—able to dissolve into water, able to be absorbed by the body’s tissues and detected by its nervous receptors.
These qualities are the whole reason why cooking exists. If your methods are able to reproduce them then you won’t have to spend your time on unnecessary embellishments.
That’s what this website is all about.
- Brown the chicken.
Preheat your pan.
Just like I described above.
Turn on your oven hood fan, and open a kitchen window.
Sautéing throws up a lot of heavy vapor.
Get the kids out of the kitchen. Get the dogs out of the kitchen.
Regard your surroundings for a moment. You’re about to have a shallow pan filled with 400°F oil. That’s dangerous stuff.
Add enough oil to nearly cover the pan’s bottom surface.
Again, just like I described in the section above.
Using your tongs, gently set the chicken pieces into the pan, skin side down.
Let them sit until the skins are crusty and have a deep, almost orange hue.
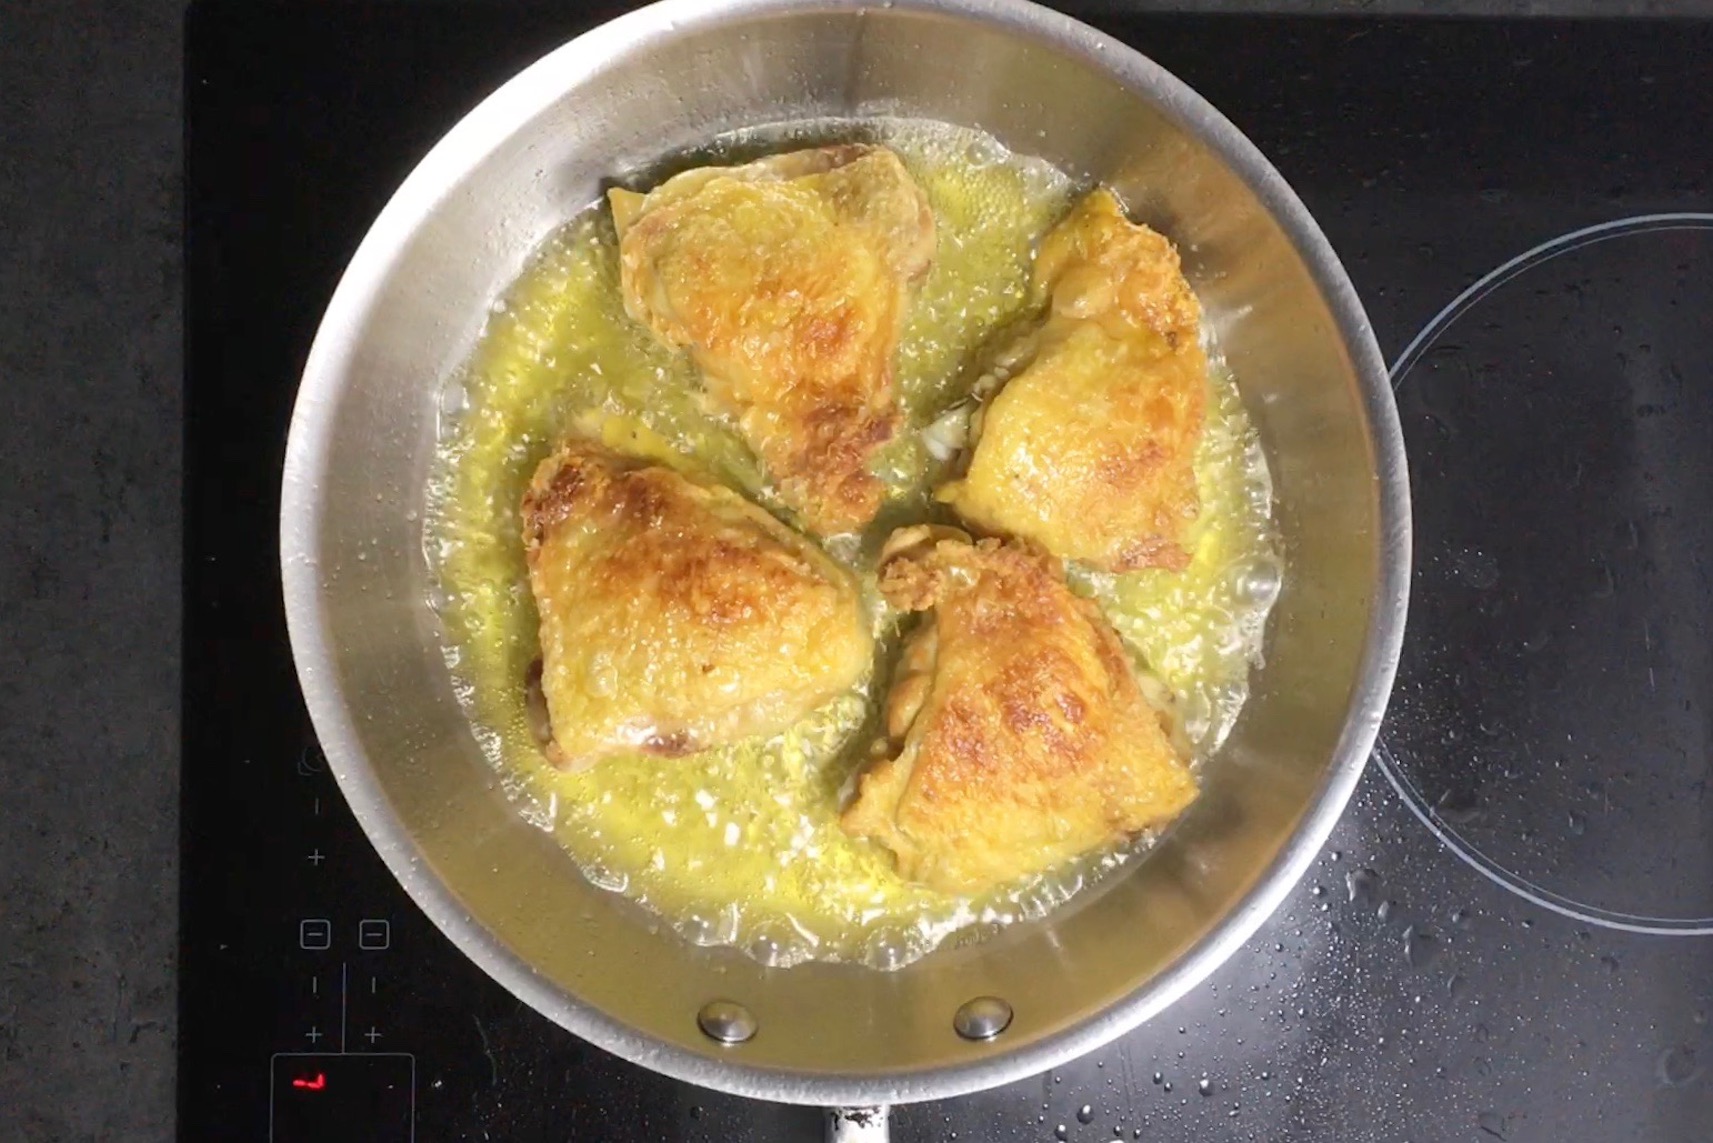
This will take between three and four minutes.
Don’t futz with the chicken, it isn’t going to stick. And for God’s sake, don’t “shake” the pan, as I often read in recipes. That’s a good way to end up with hot oil all over the back of your hand.
Flip over each piece in order to cook them for another minute, then remove them to a dish.
Cooking them on the other side briefly ensures that they’ll cook thoroughly overall.
Finally:
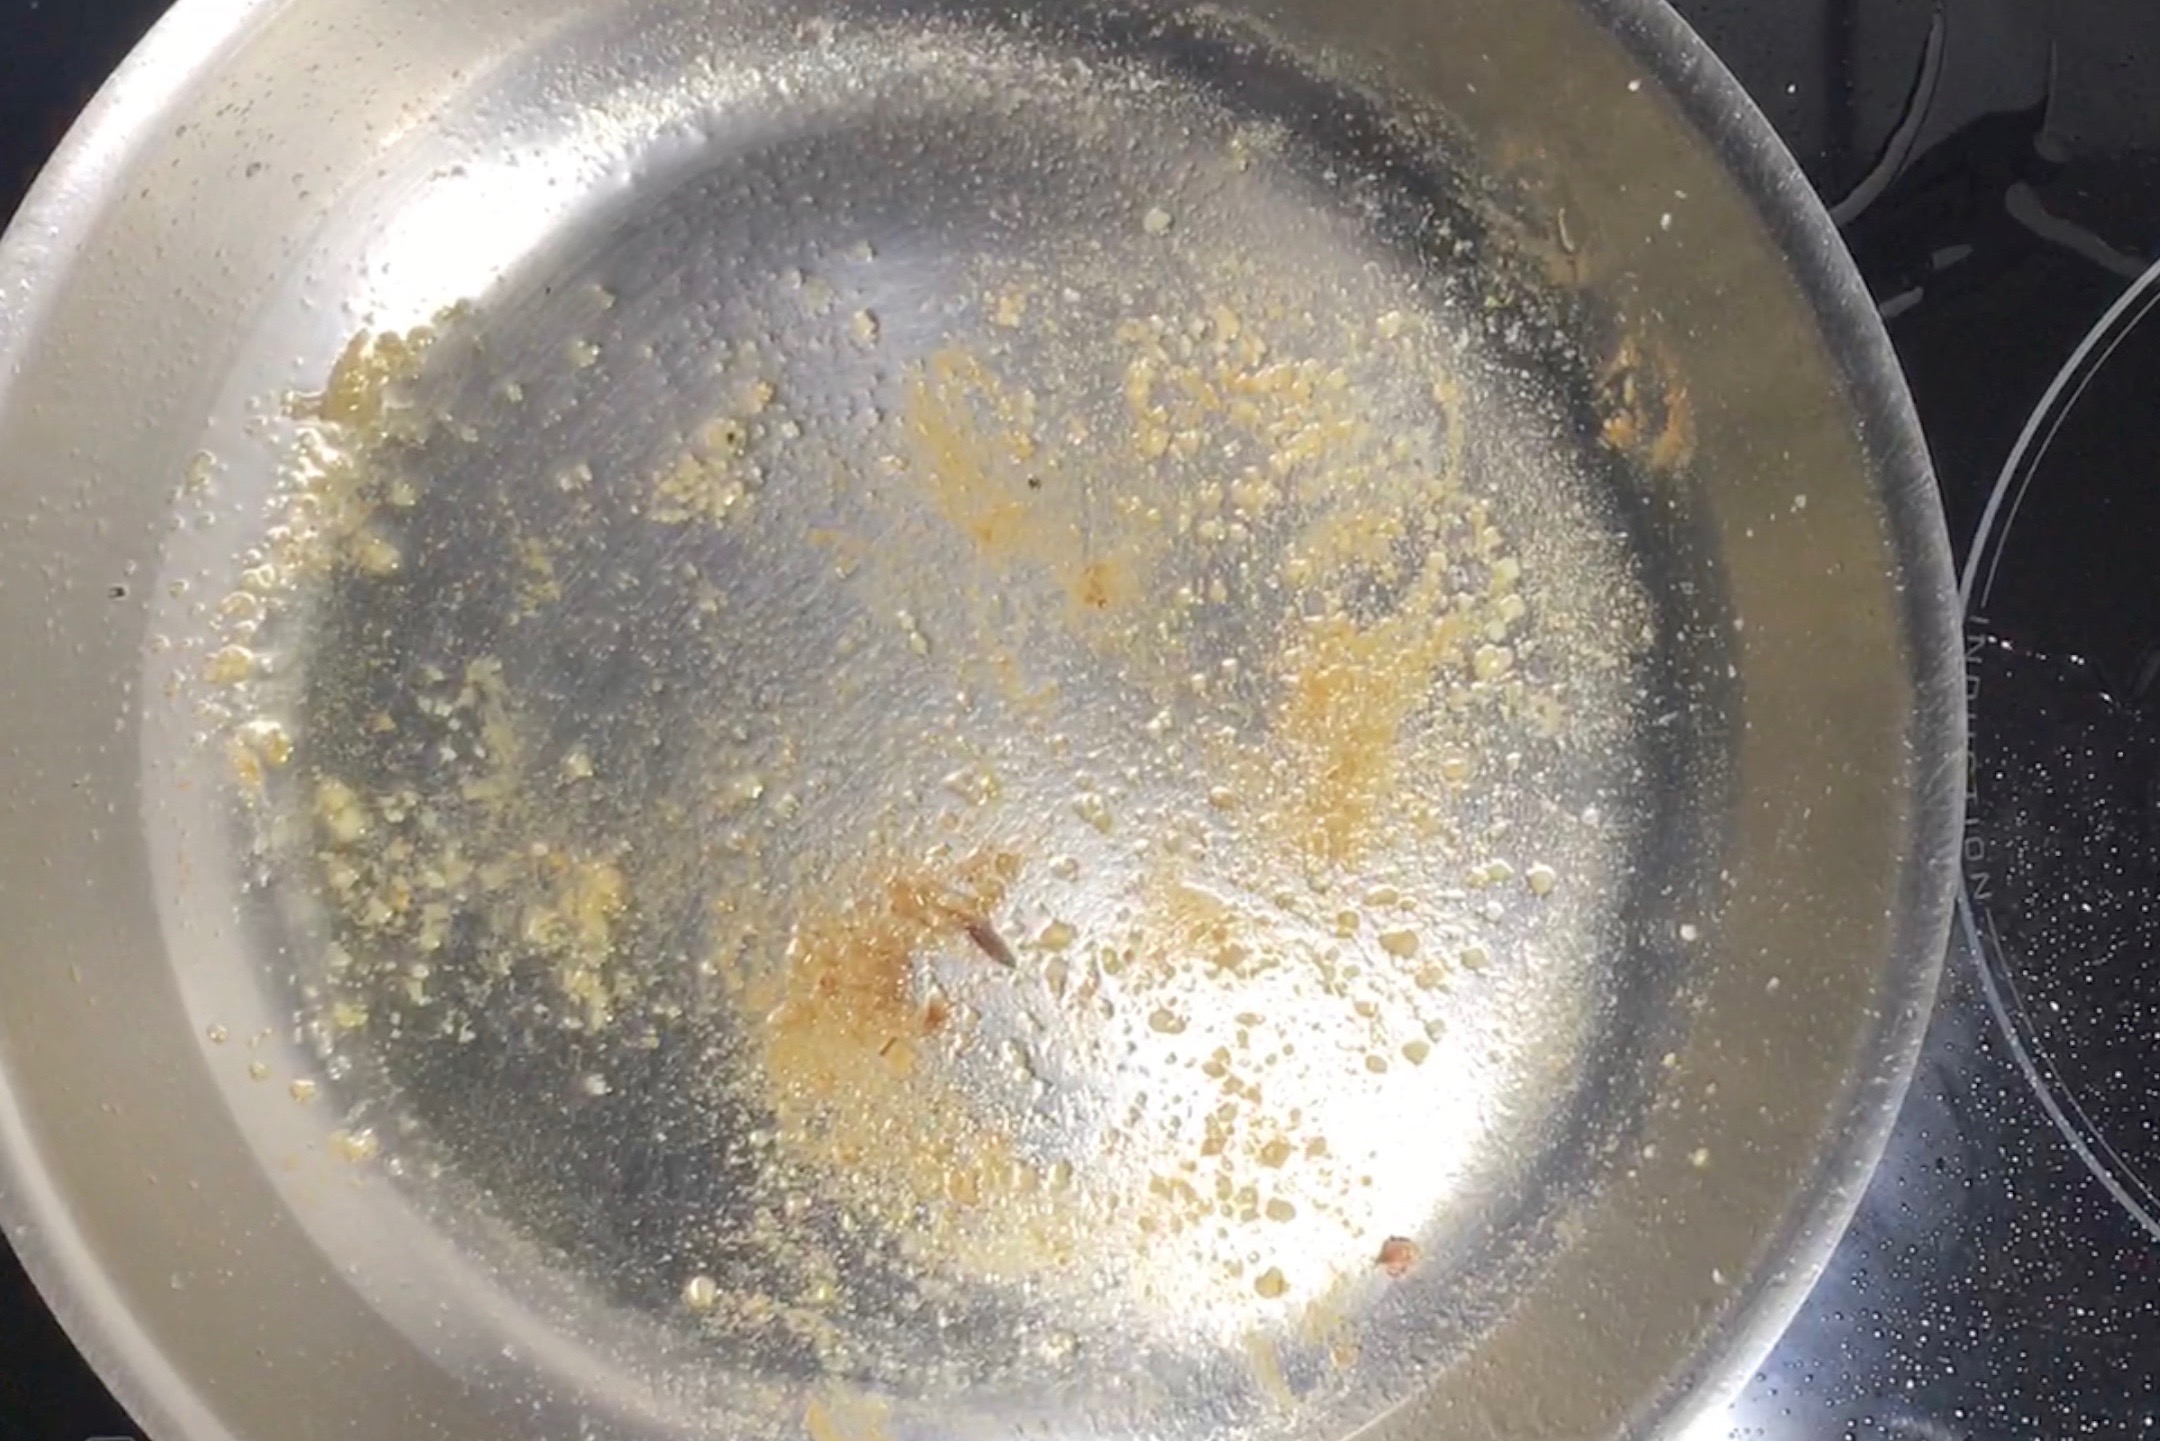
Turn the heat down just a little and allow the bare pan to continue until nearly all splattering has ceased.
This indicates that all juices have evaporated, their soluble contents likely browned against the pan.
Turn off the heat, and pour all of the oil off into the heat-proof container.
This is what a fond looks like:
And here’s the whole process, from start to finish:
- Sweat the aromatics.
Aromatic onion vegetables contribute a complex sweetness that fulfills the flavor of your main ingredients. The best effect is always had by sweating them first, in which you cook them gently in order to effect a molecular chain reaction that transforms an onion’s signature sulphuric aromas into complex sugars.
While yellow onions are capable of producing greater depth of flavor over time, shallots seem to yield a nicely pungent sweetness and aroma in a short interval. That’s why we tend to use them in a sauté.
So:
Put the butter in your pan.
The residual heat should melt the butter immediately.
We use butter rather than the reserved cooking oil, because the cooking fat is now stale whereas the taste of fresh butter is a delight.
Add the minced shallot.
Adjust the heat so that the shallots sizzle gently.
Recipe-writers always tell you to cook the shallots until they are “translucent,” which isn’t a bad gauge once you learn what this looks like.
Sweating isn’t the same thing as caramelizing, by the way, which involves basically toasting the vegetables. While delicious, this flavor is actually less complex than what precedes it. We only caramelize when we want the flavor of caramelization, per se.
So, don’t let them brown.
- Deglaze the pan.
Deglazing is simply a way of capturing the caramelized proteins that are now stuck to the bottom of your pan. We dissolve them into a small amount of liquid, which then mixes easily into a sauce.
To deglaze, we use something like wine because it lends acidity to the eventual sauce, lifting its profile while also providing an interesting flavor that is greater than the sum of its parts.
You could use vermouth, instead. You could use beer or even vinegar.
Wine is a classic because it’s nicely balanced. It doesn’t steal the spotlight.
You need only enough to give yourself the couple of minutes that it takes to scrape up the drippings. (That’s why I’ve recommended a quarter-cup.)
So:
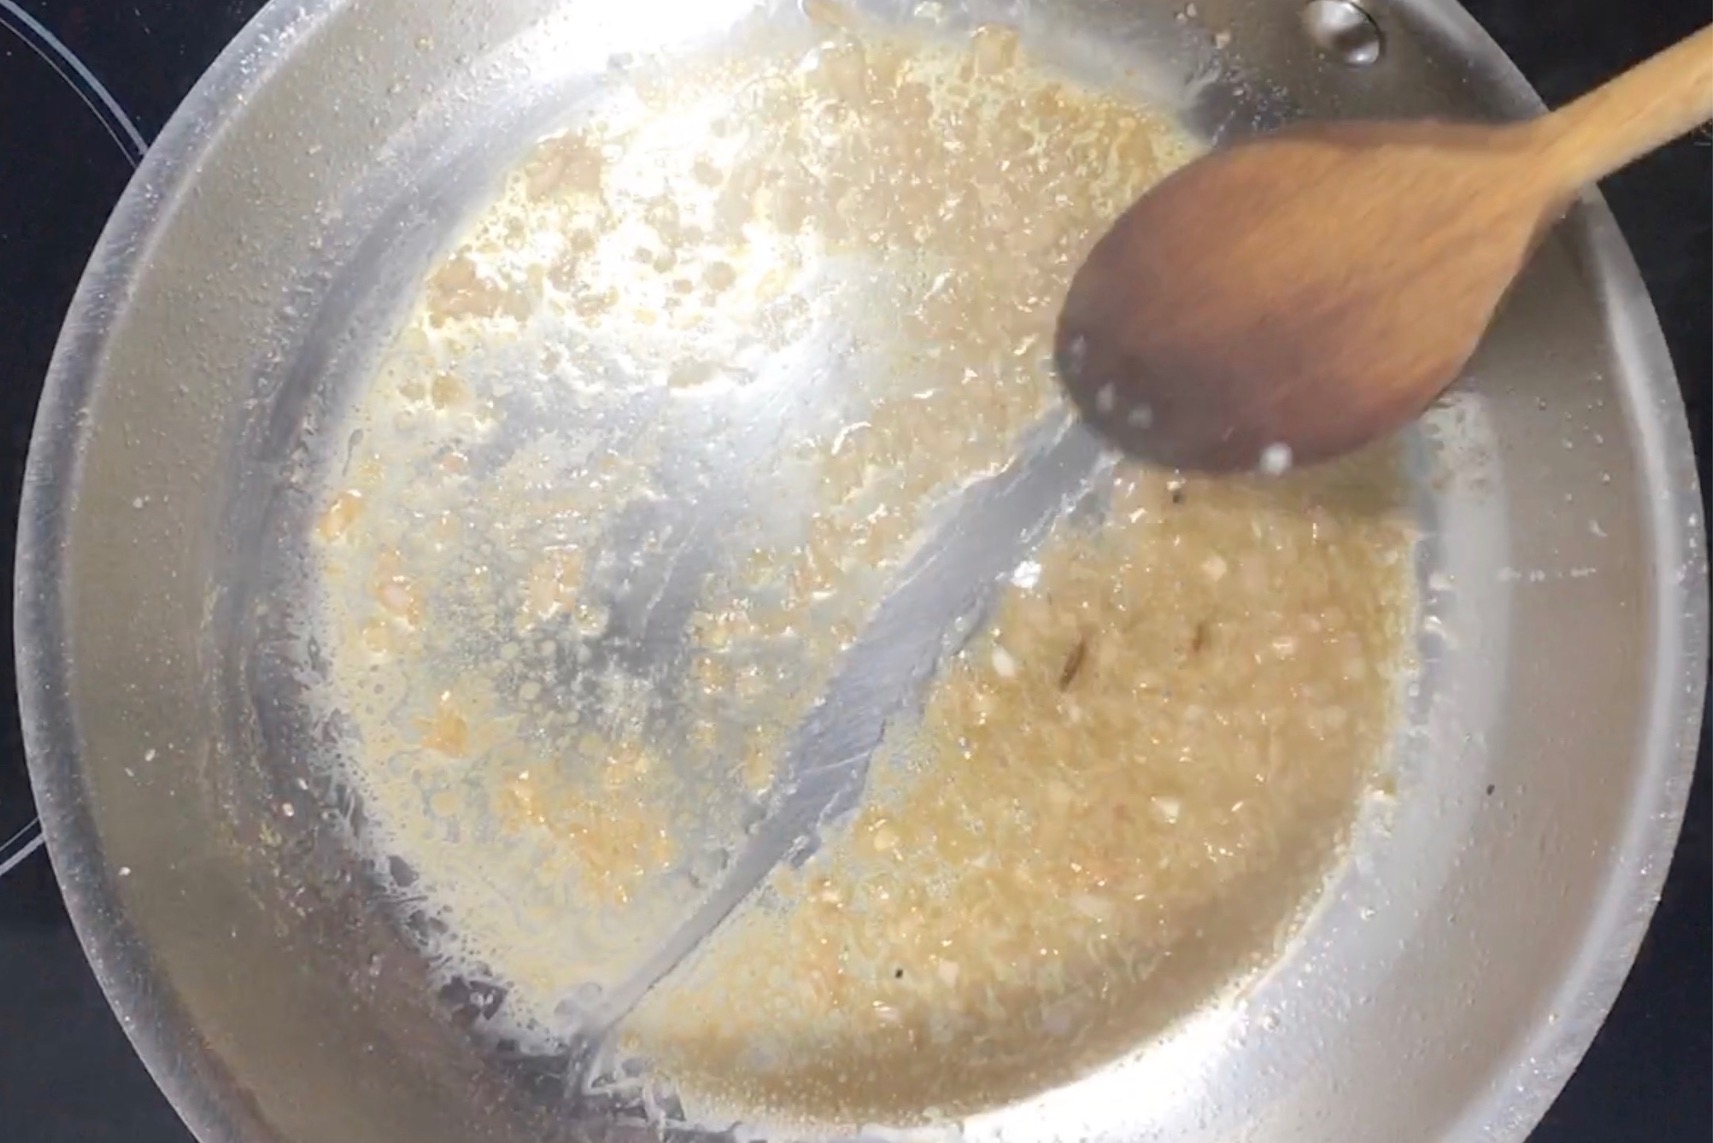
Boil the wine in your pan while scraping up the crusted drippings. Continue until your spoon traces a solid line across your pan.
What you have left is called a glaze.
- Finish cooking the chicken.
Why choose one cooking method over another?
A recipe could tell you anything at this point—to cook the pieces all at once on the stovetop, to cover the pan with a lid, to finish the chicken on a baking sheet in the oven while you do something complicated with the drippings in your skillet—it’s anyone’s guess.
Arbitrariness like this is what makes it so difficult to break free of recipes. No basis exists for choosing anything logically or intuitively.
So, let’s focus on your outcome, the meal, the moment when you sit down to actually eat what you’ve just prepared.
You’re a home cook. What you prepare can only be as delicious as the moment you take to enjoy eating it. And so any method that complicates your ability to put a meal together is the wrong way.
Finishing the chicken all at once on the stove top, for example, means that you’ll be stuck babysitting the pan for half an hour. Add another ten minutes to make the pan sauce, then holler at everyone in the house to drop whatever they’re doing and run to the table.
Likewise, covering the pan might seem like a convenient way to stabilize the cooking temperature and free up your attention. But the chicken skin will end up soggy rather than crispy, and you’ll have a panful of liquid that will take several minutes to boil off.
You’d be on your way to making a fricassée, in fact, which involves transforming this liquid into an old-fashioned gravy. You’ll want to have already removed the skin, which is extra work, but you do it for that nice gravy.
(I’ll cover this method in the near future. This is a new website, and I’m posting fresh material each week. Sign up to my newsletter and get updates as soon as I post them.)
A sauté is all about convenience. You want just enough liquid in the pan so that the dish is done when the meat is finished, a nicely reduced sauce ready and waiting.
Experience has shown me that chicken pieces finish in twenty minutes in a medium-high oven.
So:
Pour in the water and bring it to a simmer.
This way, the dish will immediately begin to cook.
Put the pan in the oven, and set your timer.
Now, relax. You can get the table ready. If it’s all ready, start dinner with a salad or something. Or go find out why the kids are suddenly quiet and seemingly well-behaved.
The final step of this dish takes only a minute.
- Finish the sauce.
You should have something like this:
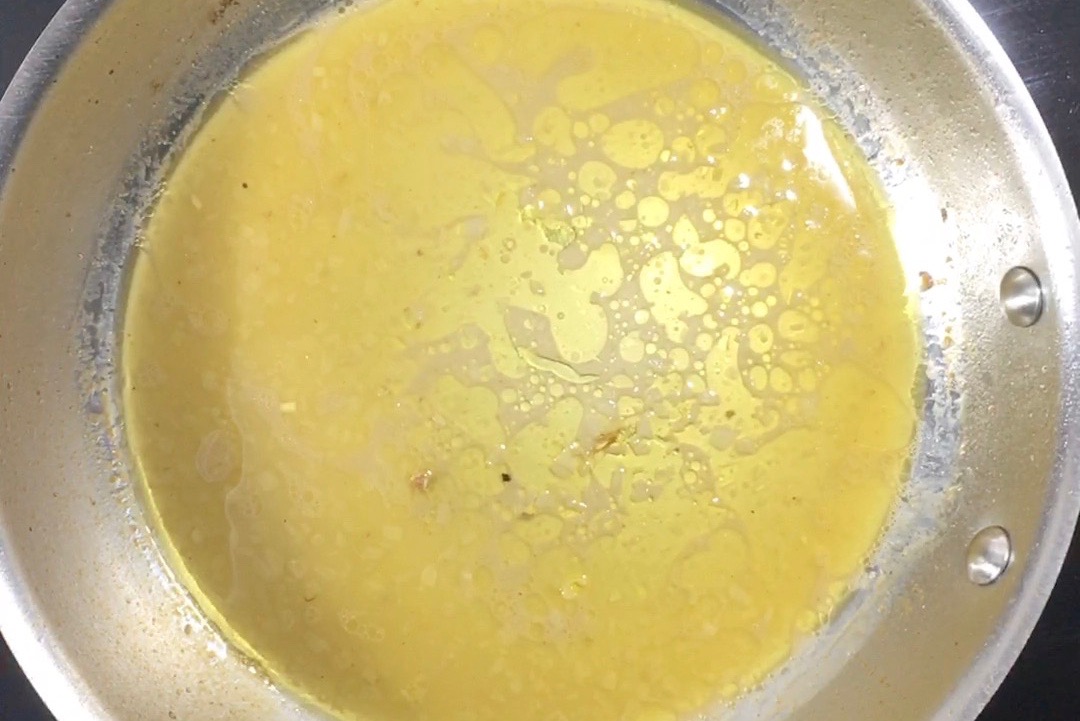
Opinions diverge over what to do with this tasty essence. The modern school of thought holds that a sauce should remain “unbound” in its natural, liquid state: You put the chicken into a shallow, bowl type of dish, then ladle out the sauce.
This works pretty well when you serve the chicken with rice or egg noodles that sop up the sauce nicely.
Otherwise:
The easiest and probably tastiest way to thicken a sauce is to swirl in a tablespoon or so of cold butter, straight out of the fridge.
As I explain here, butter possesses emulsifiers that thicken liquids, and cold butter thickens the best.
Crème fraîche is another classic, which performs similarly to butter. (It’s also in my Basic Inventory.)
Now:
Sprinkle in the minced herbs.
These go in last.
•
And that’s it. The chicken is ready to go onto the table.
The meat, properly prepared, possesses everything needed to provide you with a quality of true deliciousness.
Herbs, spices, vegetables of various kinds—they provide you with variety for its own sake, allowing you to make the same basic dish repeatedly in a way that seems fresh and invigorating each time.
Here are the main variations you’ll see:
- Deciphering Your Favorite Recipe
- If the recipe describes a whole bunch of colorful vegetables…
…then it’s referring to garnish, which are pre-cooked ingredients added to a dish at the last minute.
Garnish is a great way to use leftovers, such as an odd serving of glazed carrots or the last few boiled potatoes rolling around in a dish in your fridge.
Warm them however you wish before you sauté the chicken, then spoon them over as you finish the sauce.
- If the recipe envisions flavorful aromatic vegetables that have cooked along with the chicken…
…such as slices of fennel or leeks or even garlic, then add these in Step 5.
With the larger vegetables, try three cups (0.75 l) of roughly one-inch-long (2.5 cm) batons.
Fennel, leeks, carrots, onions, and the like, can sweat upwards of twenty minutes over low heat. The more time you give them, the greater complexity and variety of aroma they’ll impart to your sauce.
I recommend Flavor Foundations for this reason, which are aromatic vegetables rendered to maximum complexity, already made in advance just for this purpose.
- If what they have the recipe has in mind are bits of flavorful things floating in the sauce, such as olives or capers…
…then add these along with the water in Step 7.
- Finally, if what they imagine is a thick, rich sauce, such as marinara or even a gravy of some kind…
…then you’ll want to have the sauce on hand first. (A jar of spaghetti sauce is great to have on hand for just this purpose.)
Three cups (0.75 1) is once again a good amount. Add it in Step 8.
And that’s it.
 |
SHARE THIS ARTICLE
No Comments